A leak beside a chimney can look small on the ceiling, then cause far more damage behind the scenes. Chimney flashing repair addresses the metal and seal connections where the roof meets the chimney – one of the most vulnerable areas on any roofing system. When this detail fails, water can travel beneath shingles, wet roof decking, stain walls, and create conditions for mold or rot.
The right repair is not simply adding more caulk. It starts with finding exactly where water is getting past the roof-to-chimney transition, then rebuilding that area with materials that can handle rain, snow, wind, and seasonal movement. For Hudson Valley property owners, acting early can prevent a manageable repair from becoming a major roof or masonry project.
Why Chimney Flashing Fails
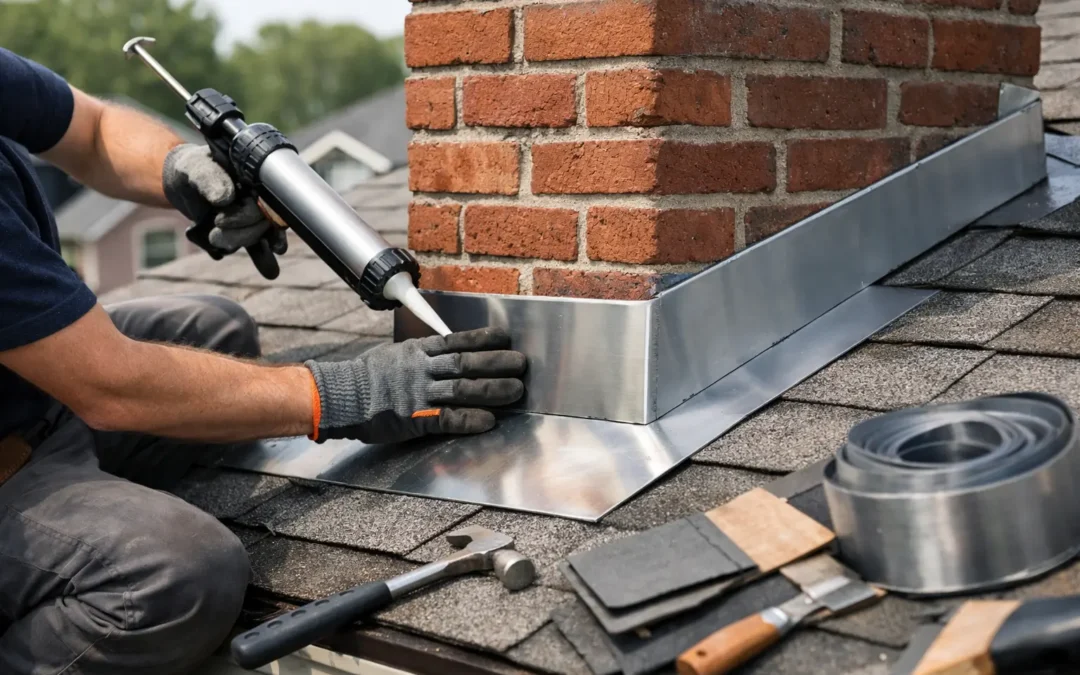
Flashing is a system of shaped metal pieces installed around the base of a chimney. Step flashing works with the shingles along the sides, while base flashing directs water away from the front. Counterflashing covers the upper edge of the flashing and is secured into the chimney masonry or mortar joint. Together, these components create a layered path for water to shed safely down the roof.
Over time, that system can fail for several reasons. Metal may corrode, loosen, or pull away from the chimney. Old sealant can crack after repeated freeze-thaw cycles. Mortar joints may deteriorate, allowing counterflashing to separate from the masonry. A previous contractor may have relied on roofing cement instead of properly lapping and integrating metal flashing with the shingles.
Wind and storm damage can bend exposed metal or lift nearby shingles. Ice buildup can also place pressure on the roof edge and chimney area. In some cases, the flashing is not the original problem at all. Cracked chimney crowns, failing mortar, damaged brick, or a leaking chimney cap can send water into the same area. A proper inspection separates a flashing problem from a masonry problem before work begins.
Signs You May Need Chimney Flashing Repair
A roof leak does not always drip directly below the chimney. Water often follows framing members before it reaches a ceiling or wall, so the visible stain can appear several feet away. Still, certain warning signs strongly point to the chimney transition.
Look for water stains in the attic near the chimney, damp insulation, peeling paint on an upper wall, or discoloration on ceilings after heavy rain. Outside, loose metal, rusted flashing, cracked sealant, missing shingles, or gaps between the chimney and roof are all reasons to schedule an inspection.
You may also notice leaks only during wind-driven rain. That pattern often indicates water is being forced behind loose counterflashing or through an exposed seam. If a leak worsens after snow melts, ice dams or backed-up water may be revealing a weakness that ordinary rainfall did not expose.
Do not assume that a dry ceiling means the issue has resolved. Small amounts of water can soak into decking and framing without becoming visible indoors right away. Catching the problem while the roof structure is still sound is usually the best path to a more focused, affordable repair.
When Chimney Flashing Repair Is the Right Fix
A targeted flashing repair makes sense when the surrounding roof is in good condition and the failure is limited to the chimney area. A roofing professional may remove shingles around the chimney, inspect the deck for moisture damage, replace step and base flashing as needed, install or reset counterflashing, then properly weave new shingles into the repaired section.
This approach preserves the rest of a serviceable roof while restoring the vulnerable transition. It is especially effective when flashing was installed incorrectly during a prior roof replacement or when a localized storm event damaged an otherwise healthy roof.
A repair has limits, however. If shingles throughout the roof are brittle, curling, missing granules, or near the end of their expected lifespan, replacing flashing alone may be short-lived. The new metal can be installed correctly, but aging shingles around it may continue to fail. In that situation, it can be more practical to coordinate chimney flashing work with a roof replacement.
The same is true for severe masonry deterioration. If the chimney has open mortar joints, loose bricks, or a damaged crown, those issues must be corrected along with the roof work. Water protection is only as strong as the full assembly.
Why Caulk Is Rarely a Long-Term Answer
Sealant has a place in a properly installed flashing system, but it should not be the primary defense against water. Smearing roofing cement or caulk over gaps may slow a leak temporarily, particularly during an emergency. It can also trap water, conceal failing metal, and make a later repair more difficult.
Professional repairs rely on overlapping materials that shed water by design. The goal is to make the roof resistant to water intrusion even as sealants age. That detail matters on steep roofs, older homes, and chimneys exposed to strong weather.
What a Professional Repair Should Include
A reliable contractor begins with an inspection from both the roof and, when accessible, the attic. The inspection should check the metal flashing, shingle condition, roof decking, chimney mortar, crown, cap, and any signs of moisture migration. Photos and a clear explanation of the findings help property owners understand whether the scope is a simple repair, a masonry coordination issue, or part of a larger roofing need.
During the repair, damaged materials should be removed rather than covered over whenever possible. New step flashing should be integrated with each shingle course along the chimney sides. Base flashing and back-pan flashing must direct water away from the chimney, particularly on the uphill side where runoff collects. Counterflashing should be secured correctly into the masonry and sealed at the appropriate points.
The final result should look clean, sit tight to the chimney, and blend into the roof without exposed shortcuts. Cleanup matters, too. Nails, old metal, and roofing debris should not be left around a driveway, lawn, or commercial entryway.
Hudson Valley Weather Makes Details Matter
In the Hudson Valley, roofs face hard rain, wind, heavy snow, ice, and rapid temperature swings. Those conditions repeatedly expand and contract metal, shingles, sealants, and masonry. A minor gap around a chimney can become a major entry point after one difficult winter.
That is why chimney repairs should account for more than the visible leak. The materials need to be compatible, the metal needs room to perform, and the roof drainage path needs to remain clear. Gutters and downspouts also deserve attention. When roof runoff backs up, water can linger in places where flashing is already under stress.
Property owners with older homes should be especially cautious about layered repairs. Multiple rounds of patching can hide the original construction and make it difficult to see whether water has damaged the roof deck. An honest inspection can identify when a focused repair is still sensible and when deeper work is the safer investment.
Protect the Repair After the Work Is Done
Once the flashing is repaired, occasional visual checks can help catch changes before another leak develops. After major storms, look from the ground for displaced shingles, loose metal, or debris collecting above the chimney. Avoid climbing onto the roof yourself, especially when surfaces are wet, icy, or steep.
Keep gutters flowing, trim branches that scrape the roof, and schedule an inspection if you see new interior staining. If you use a fireplace or wood stove, have the chimney and cap evaluated regularly as part of normal property maintenance. A sound roof and a sound chimney work together to keep water outside where it belongs.
If water is appearing near your chimney, do not wait for the next storm to test it again. CPG Roofing & Siding can inspect the roof-to-chimney connection, explain the repair options clearly, and help protect your property with workmanship built for local weather.